Enabling RF Outlets
Because of Sky’s commitment to the environment and the power required to drive the RF Outlets, the RF Outlets on Sky boxes are disabled by default in order to save energy.
If you intend to connect a second TV to your Sky box using the RF outlets then you will need to enable them, you can find out how to do this bellow.
Please note that DRX890W, DRX895W, DRX890WL & DRX895WL Sky+HD boxes and DRX595 SkyHD boxes do not have RF input/output ports. You will need to use an “iO-LINK”, Triax Link or similar device to replicate this functionality.
Choose Your Box
Select your Sky box from the menu in order to view the corresponding instructions.
Now Heres What To Do
Looks like you haven't yet selected the type of Sky box you have.
Select the Sky box you have from the menu above to display the corresponding instructions right here. We'll even remember your selection for when you view other How To Guides to make things easier.
Sky Q 1TB & 2TB Boxes

!
This HowToGuide guide does not apply to Sky Q 1TB & 2TB boxes as they do not have RF Outlets or an I/O Port.
Sky Q Mini Boxes

!
This HowToGuide guide does not apply to Sky Q Mini boxes as they do not have RF Outlets or an I/O Port.
Current Sky+HD boxes

1
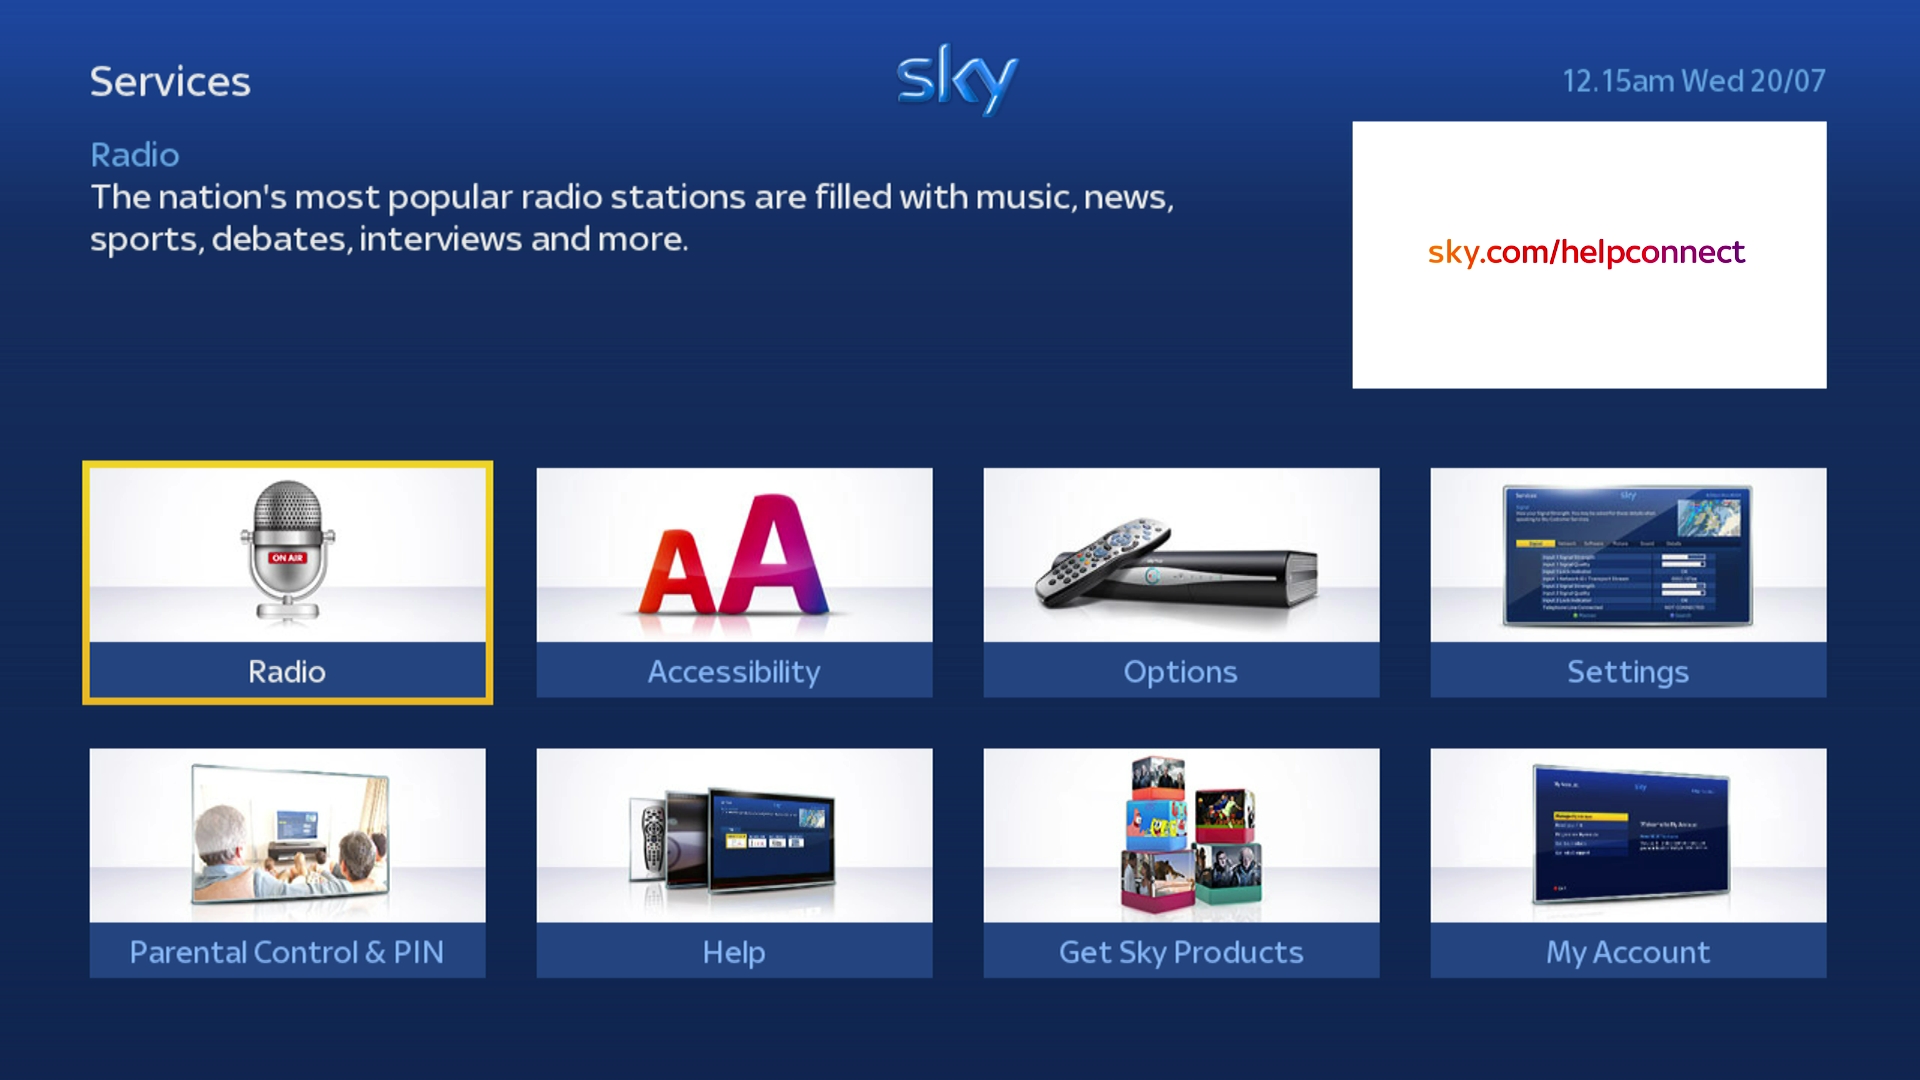
Press the Services button on your Sky remote.
The Services homepage should now be displayed on screen with the “Radio” tile highlighted.
The Services homepage should now be displayed on screen with the “Radio” tile highlighted.
2
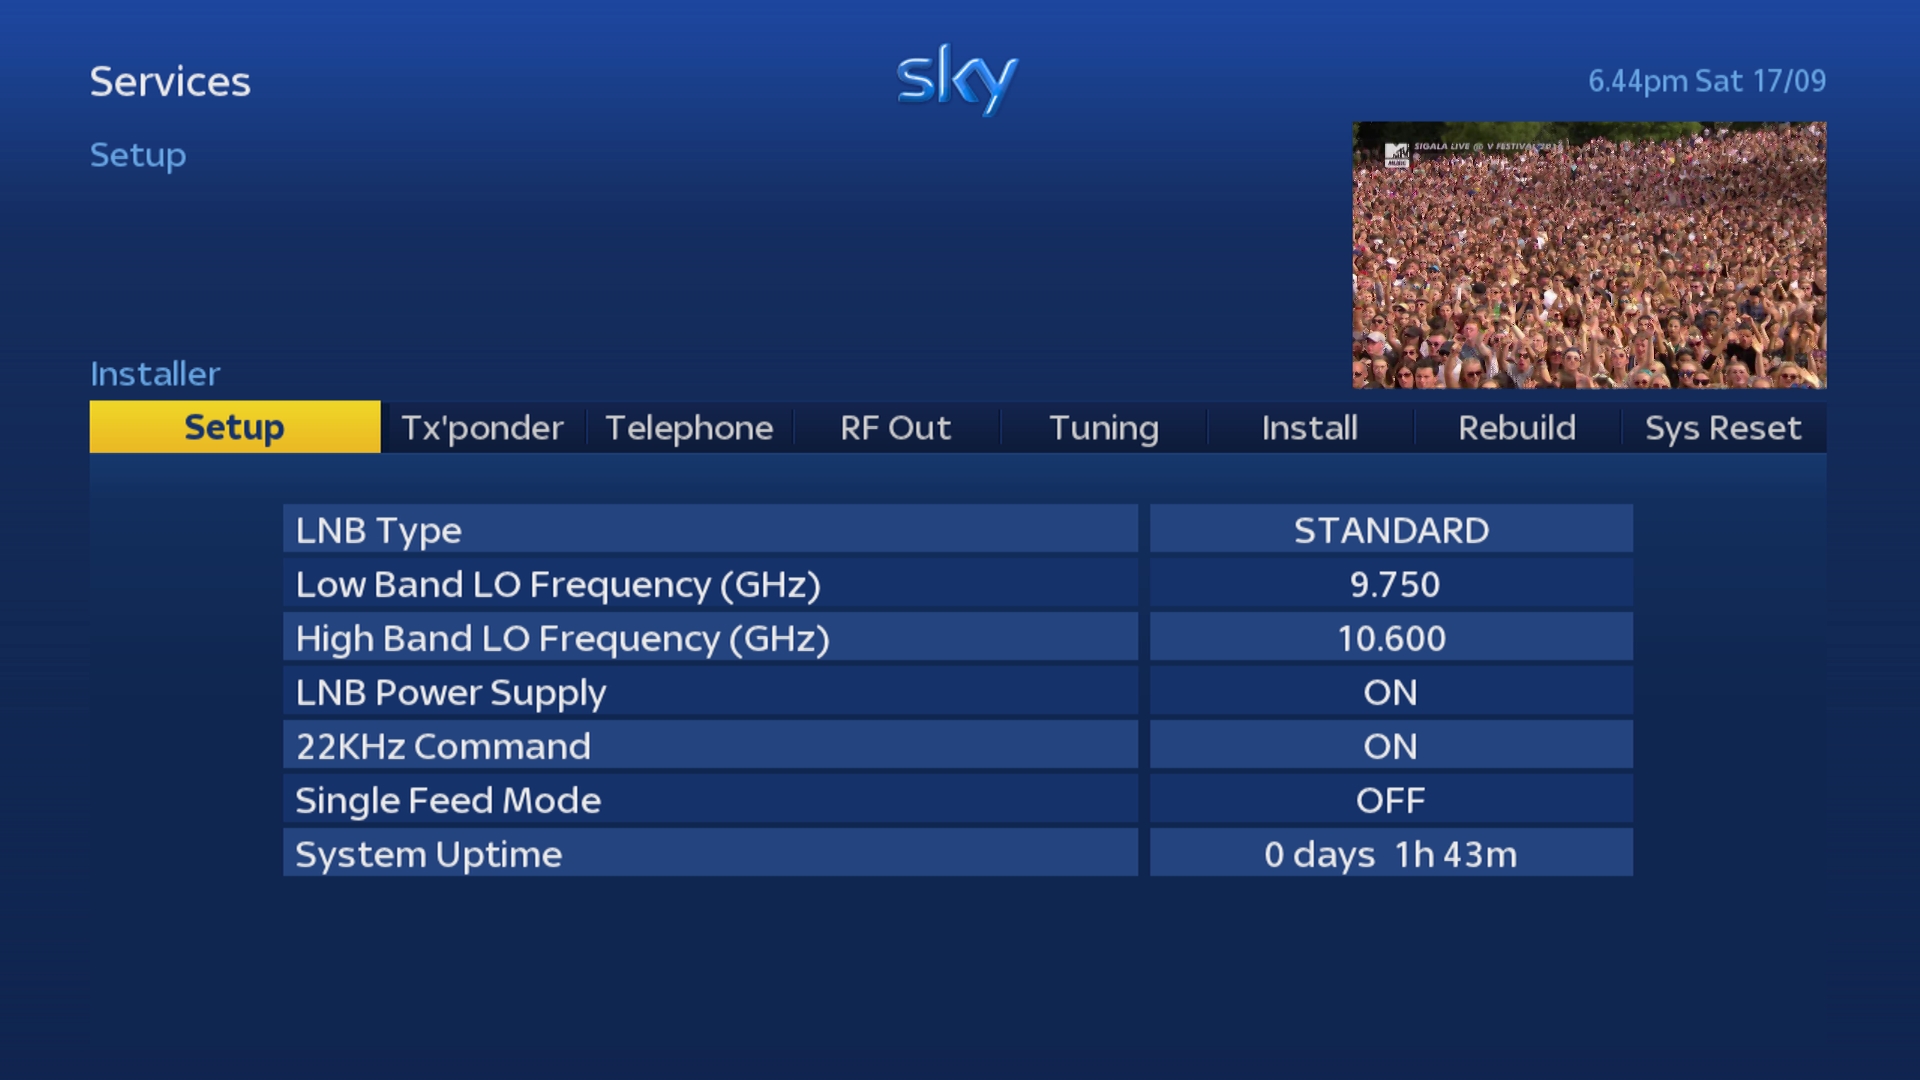
Now press 0 0 1 Select on your Sky remote in quick succession.
You should now be in the hidden Installer part of the Services homepage with the “Setup” tab highlighted
If the following menu is not showing on your TV screen then press the Sky button and repeat the process again from Step 1.
You should now be in the hidden Installer part of the Services homepage with the “Setup” tab highlighted
If the following menu is not showing on your TV screen then press the Sky button and repeat the process again from Step 1.
3
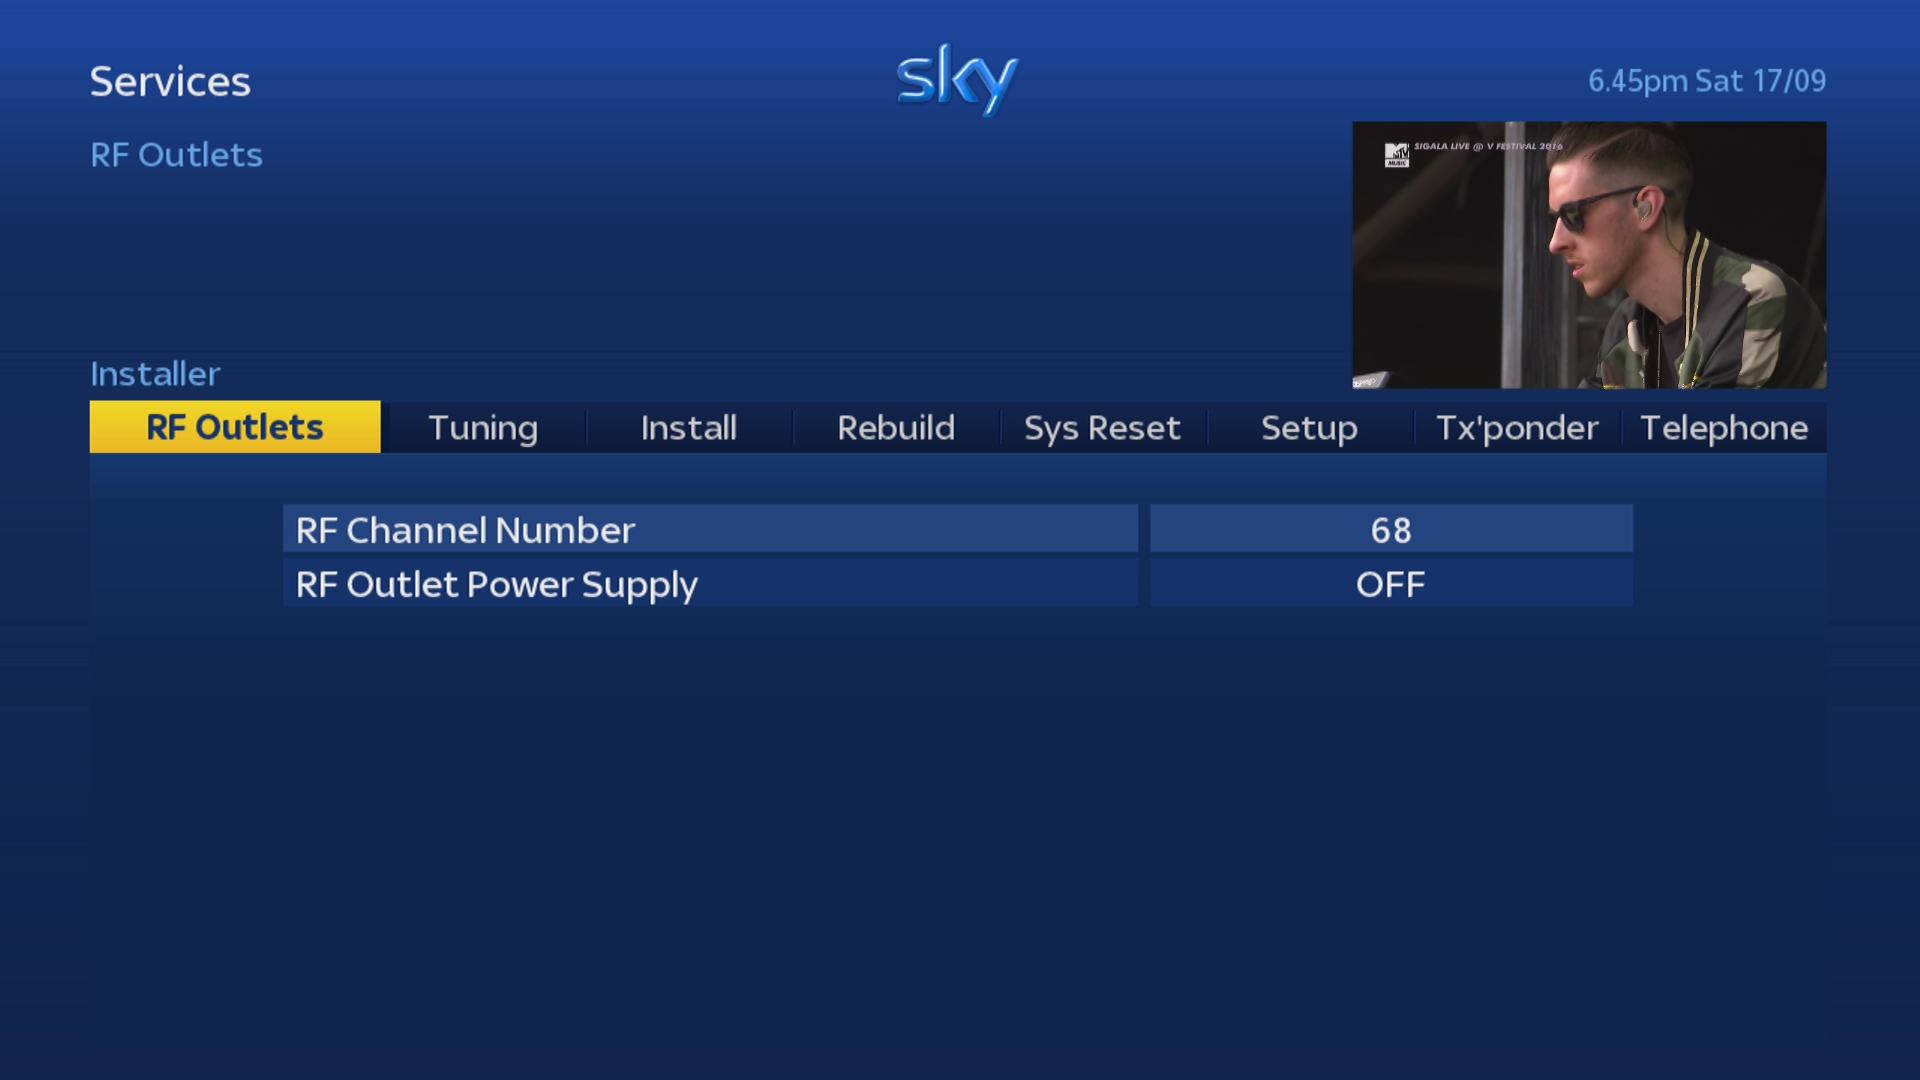
Use the Left or Right arrows on your Sky remote to scroll across to the tab labelled “RF Out".
This should change to “RF Outlets” once highlighted.
This should change to “RF Outlets” once highlighted.
4
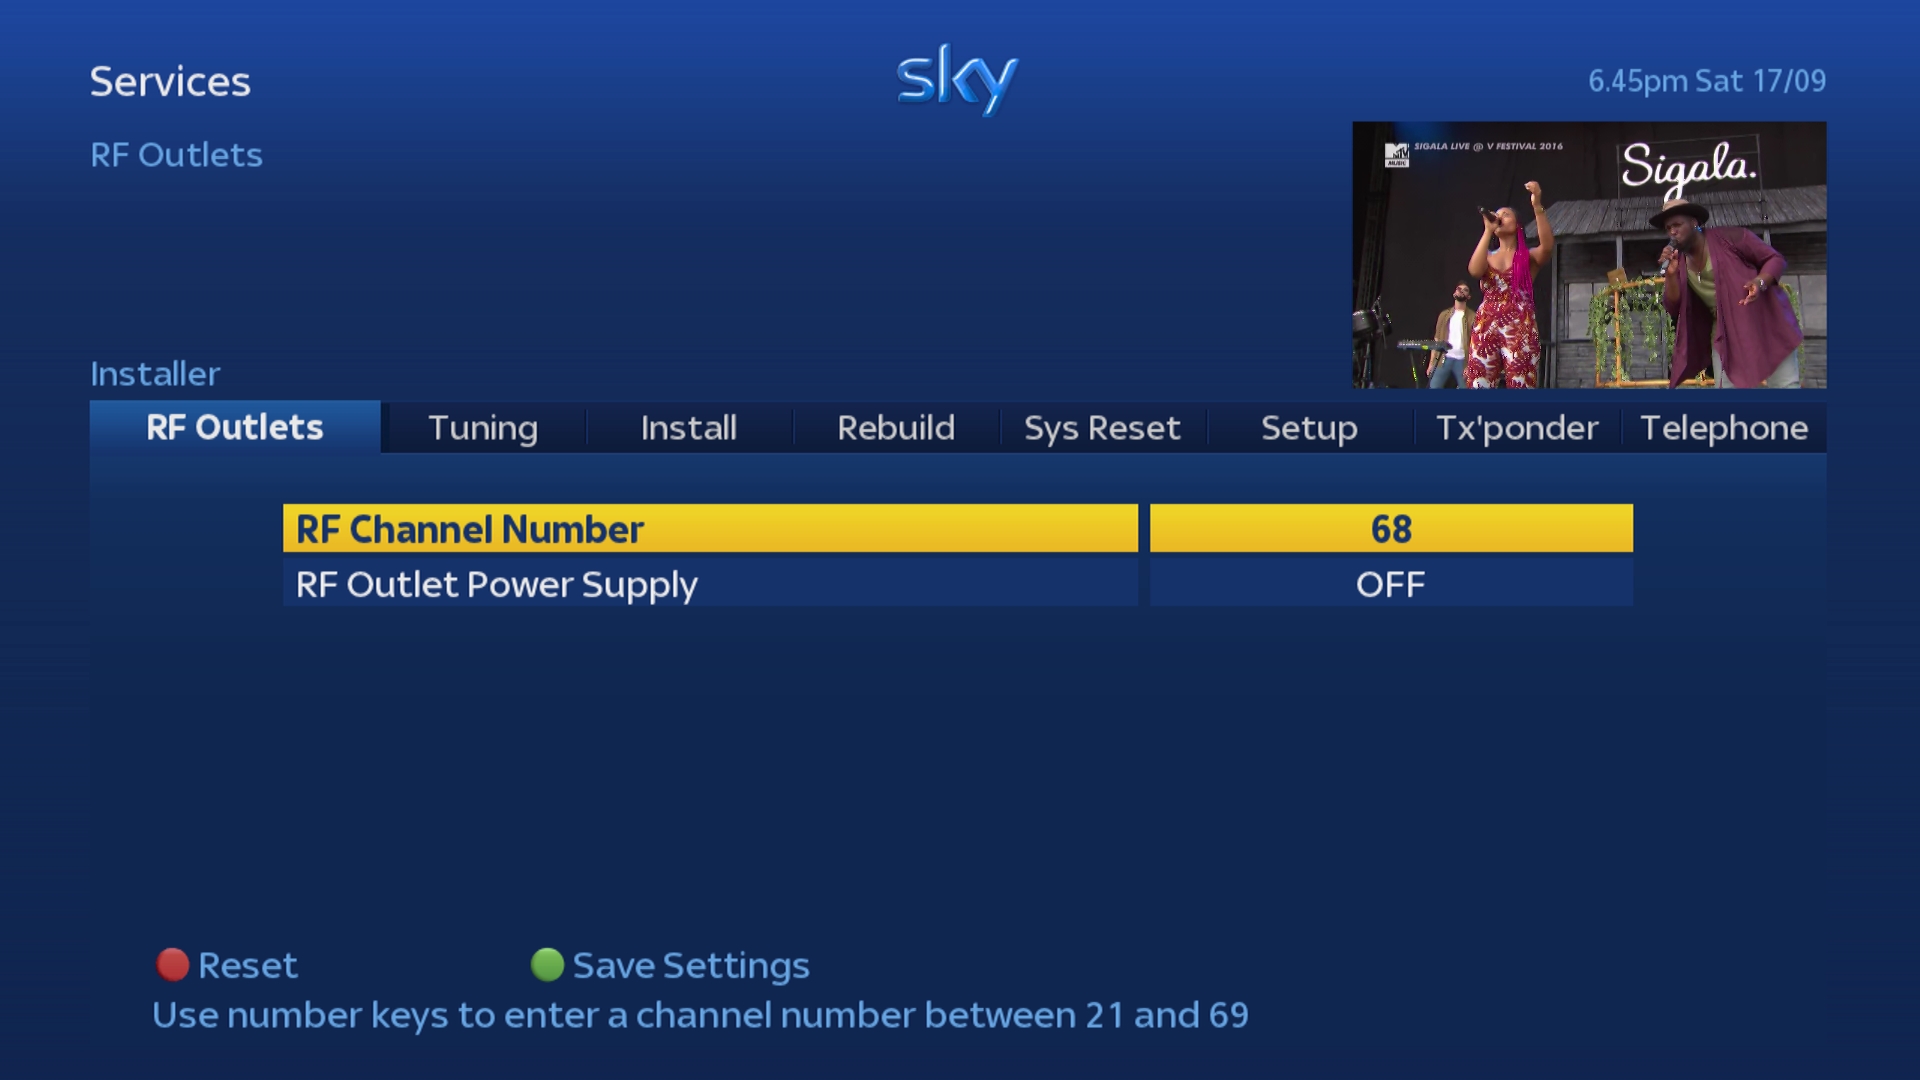
Press either the Select or Down arrow on your Sky remote to select the "RF Outlets" option.
"RF Channel Number" should now be highlighted.
"RF Channel Number" should now be highlighted.
5
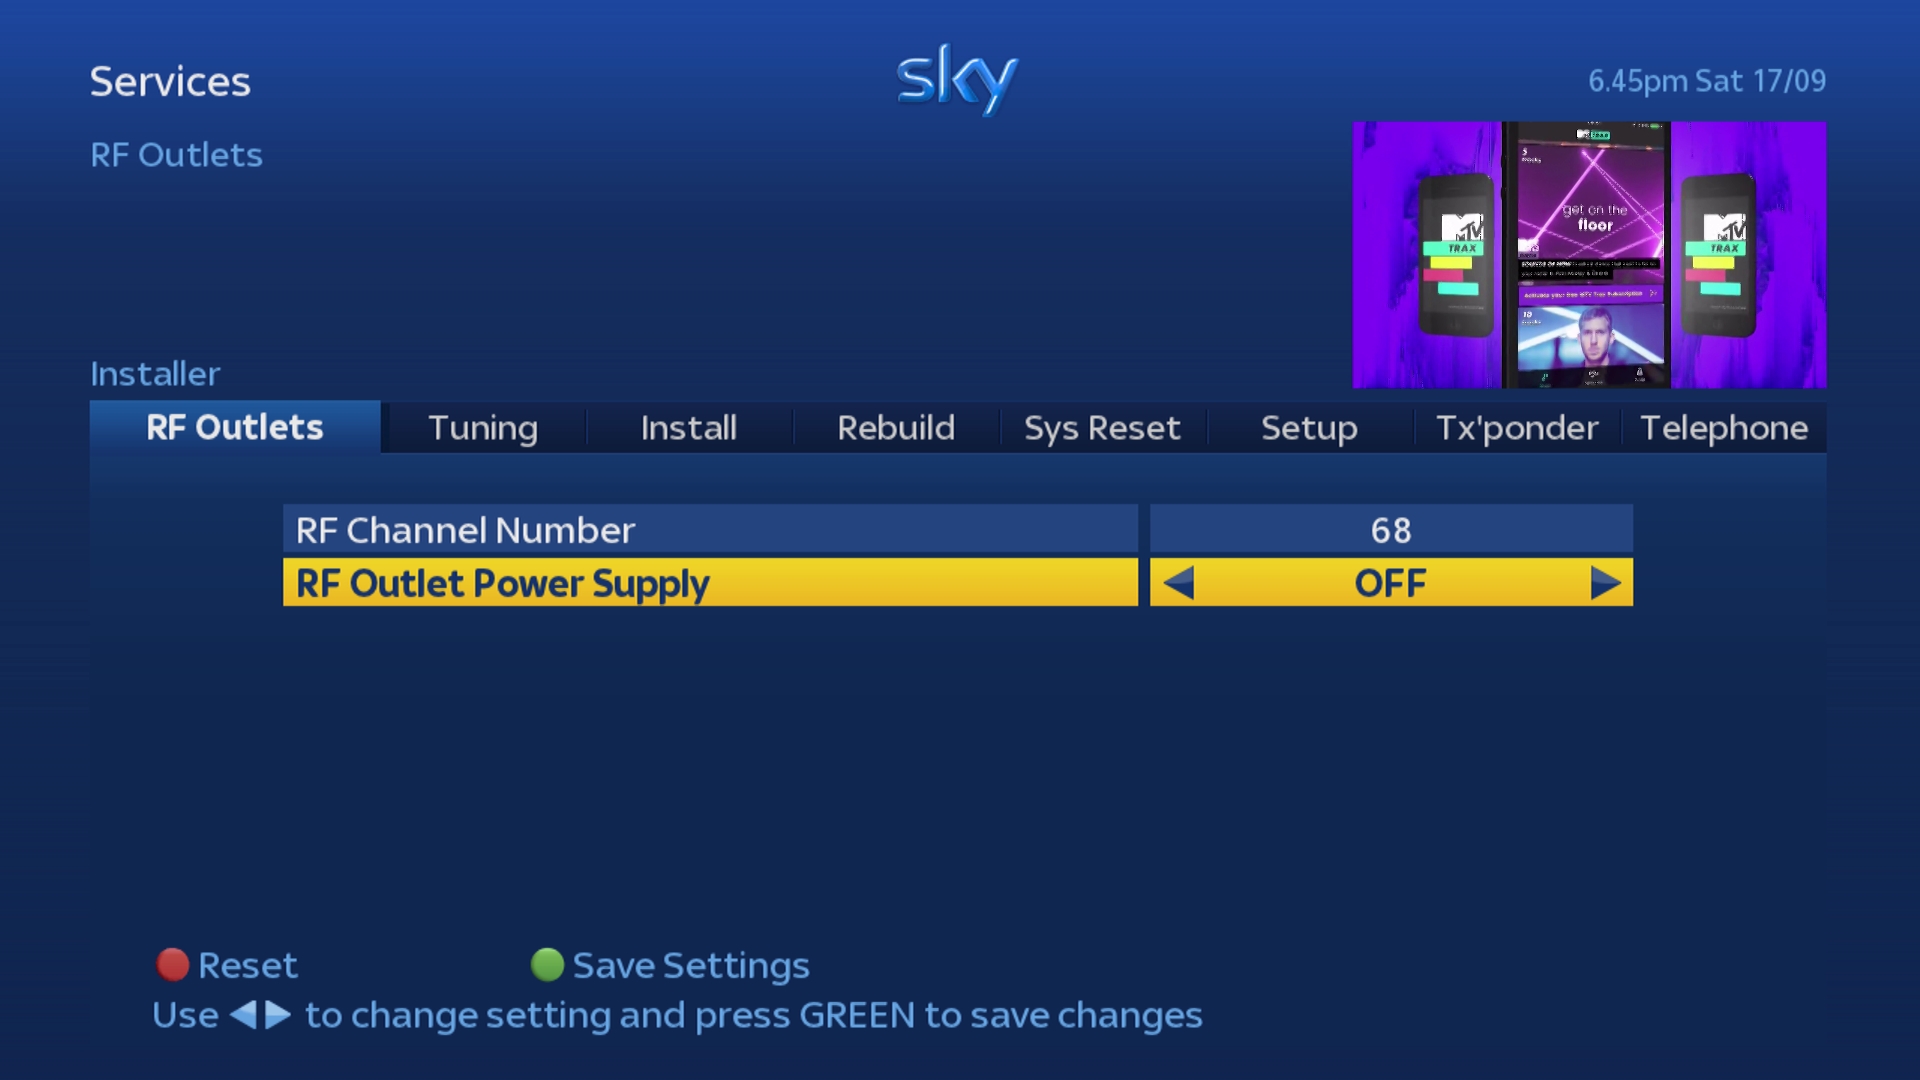
Press the Down button on your Sky remote to highlight the "RF Outlet Power Supply" option.
6
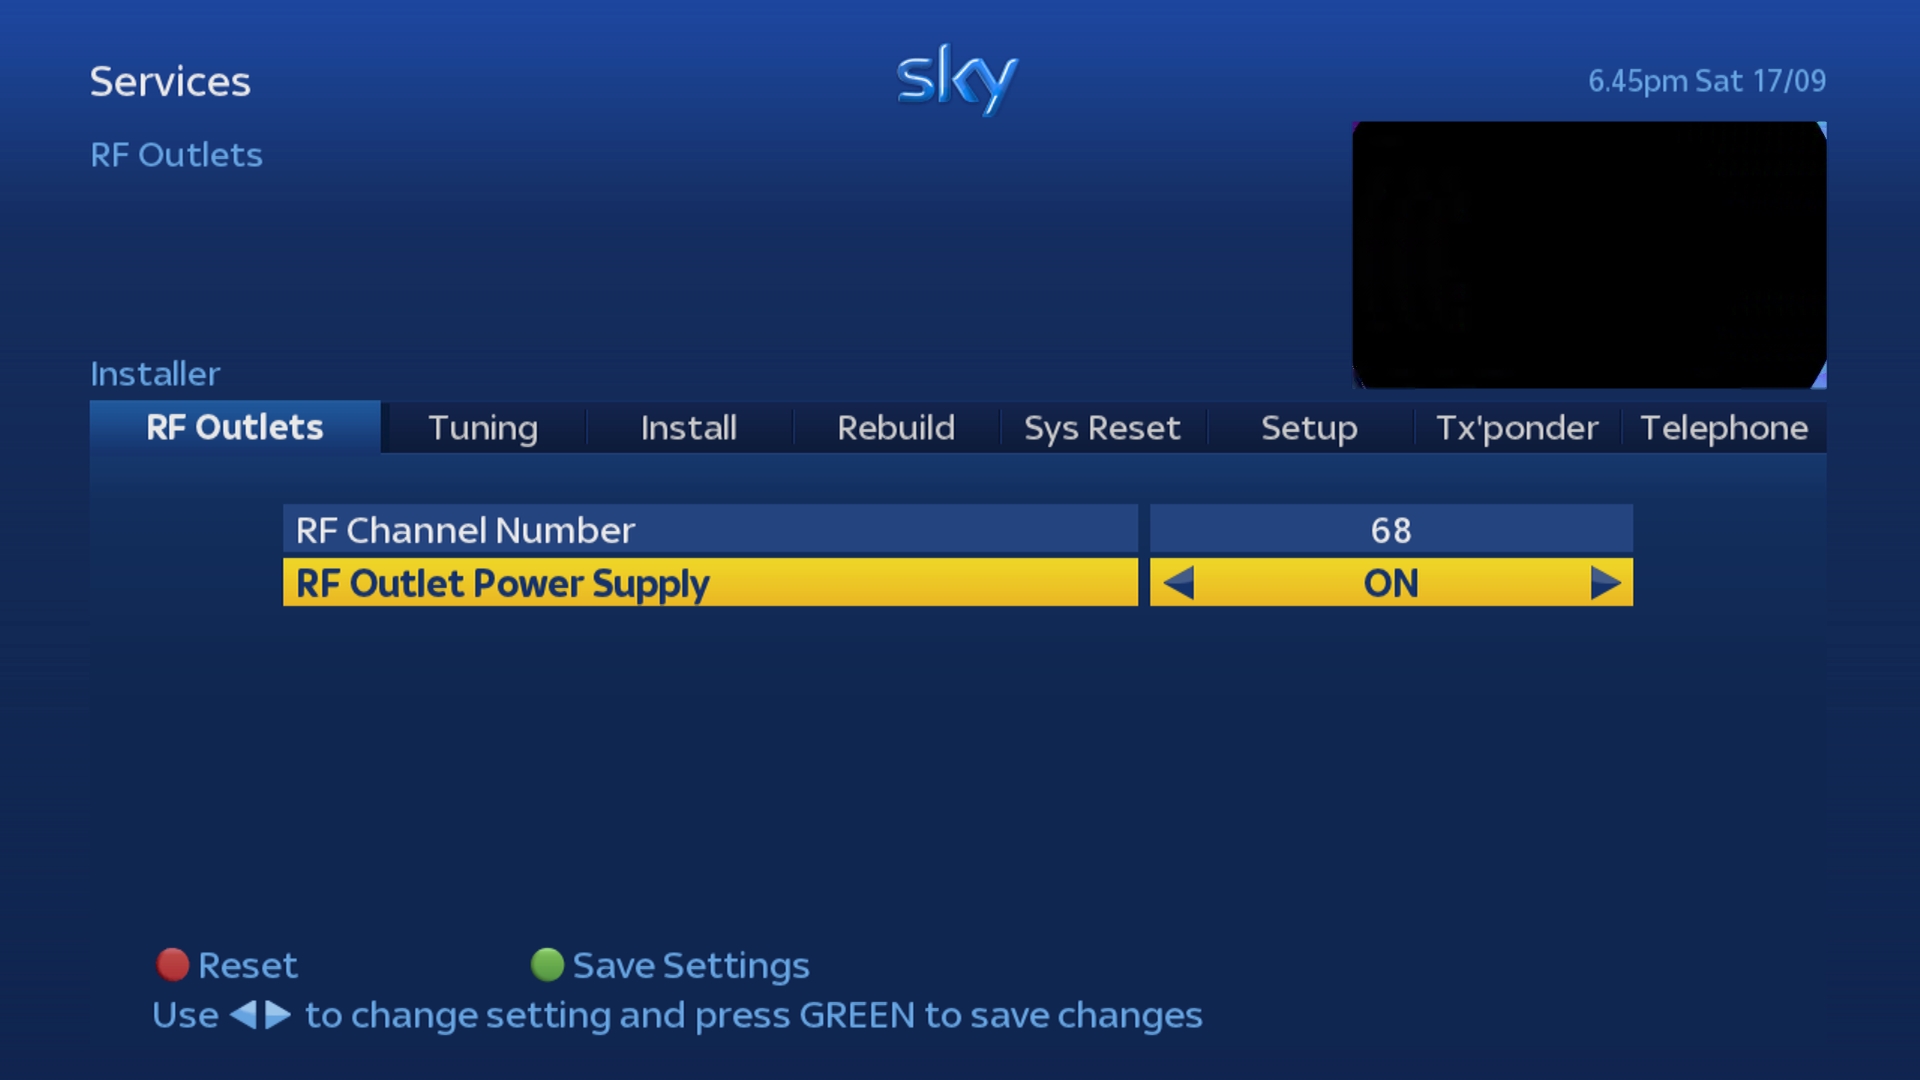
Use the Left or Right arrows on your Sky remote to change the option to ON.
7
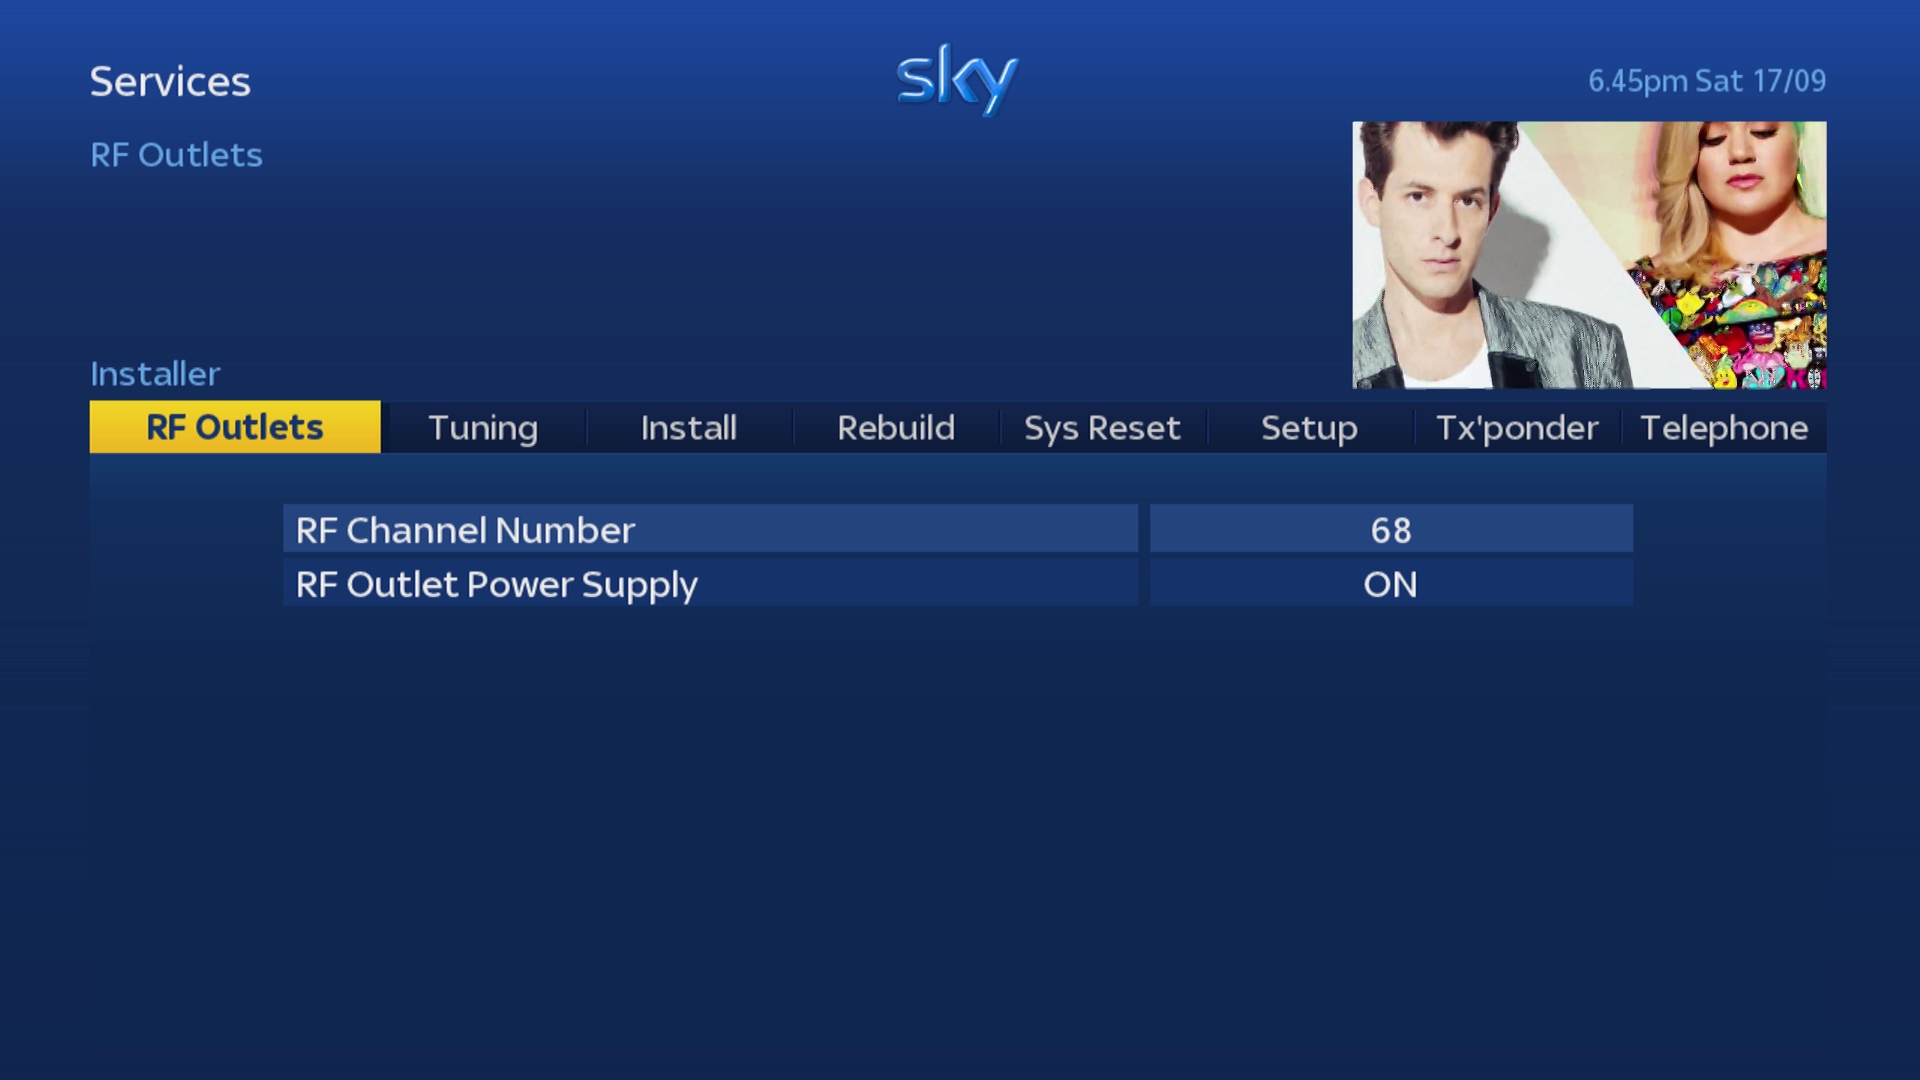
Press the Green button on your Sky remote to save the changes.
Older Sky+HD boxes

1
Press the Services button on your Sky remote.
The Options menu should now be highlighted.
The Options menu should now be highlighted.

2
Press the 0 button on your Sky remote.
The Picture tab within the Settings menu should now be highlighted.
The Picture tab within the Settings menu should now be highlighted.

3
Now press the 0 1 & Select buttons on your Sky remote in quick succession.
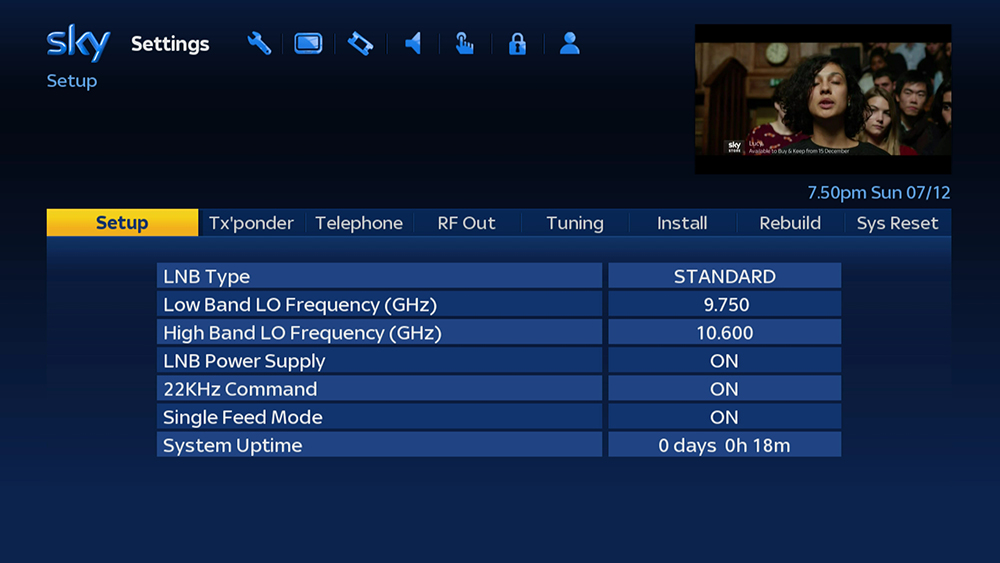
You should now be in the hidden part of the Settings menu with the Setup tab highlighted.
If the following menu is not showing on your TV screen then press the Sky button and repeat the process again from Step 1.
You should now be in the hidden part of the Settings menu with the Setup tab highlighted.
If the following menu is not showing on your TV screen then press the Sky button and repeat the process again from Step 1.
4
Use the Left or Right arrows on your Sky remote to scroll across to the tab labelled “RF Out".
This should change to “RF Outlets” once highlighted.
This should change to “RF Outlets” once highlighted.
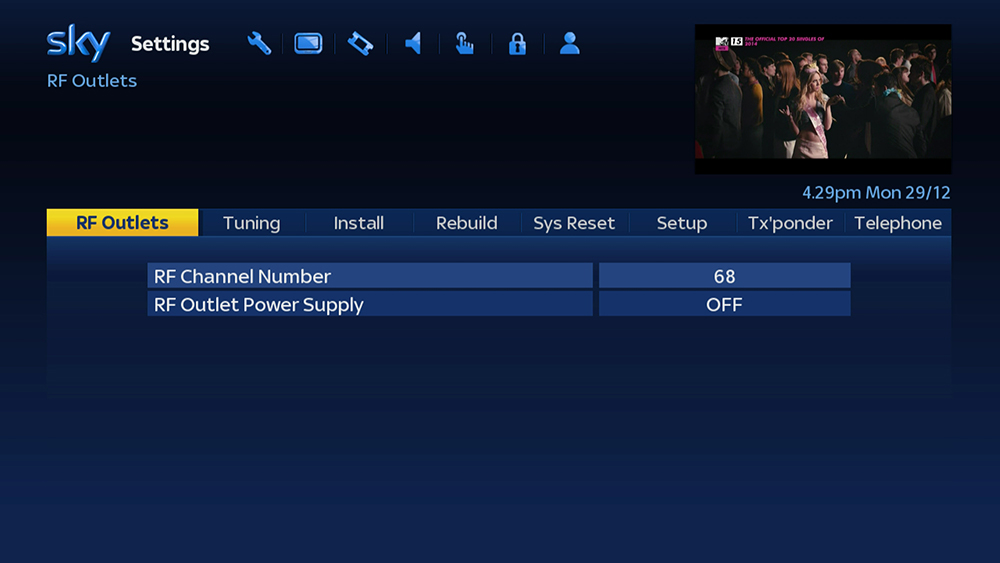
5
Press either the Select or Down arrow on your Sky remote to select the "RF Outlets" option.
"RF Channel Number" should now be highlighted.
"RF Channel Number" should now be highlighted.
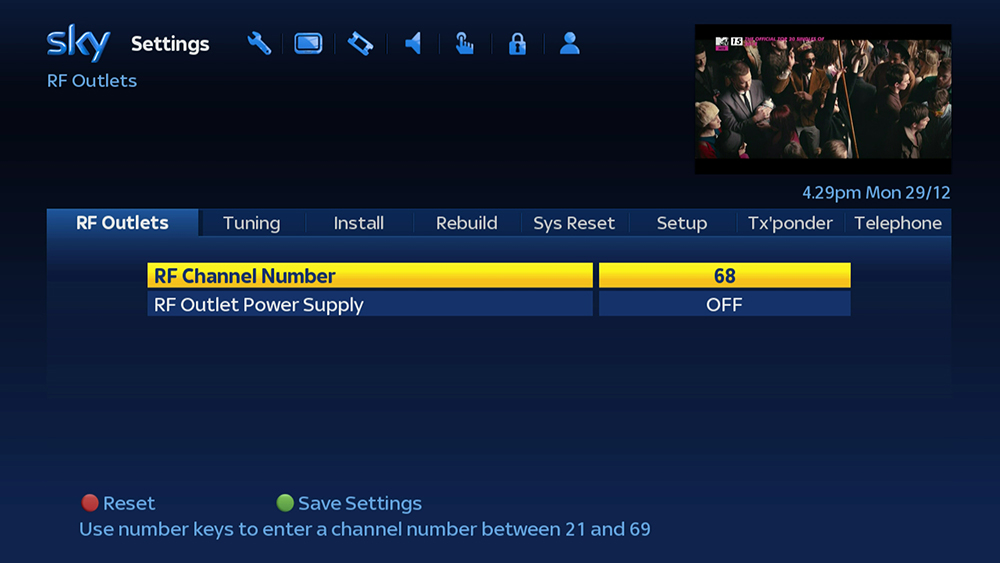
6
Press the Down button on your Sky remote to highlight the "RF Outlet Power Supply" option.

7
Use the Left or Right arrows on your Sky remote to change the option to ON.

8
Press the Green button on your Sky remote to save the changes.

SkyHD Box

!
DRX595 SkyHD boxes do not have RF input/output ports built in.
You will need to connect an “iO-LINK”, Triax Link or similar device to your SkyHD boxes I/O port, in order to replicate this functionality.
You will need to connect an “iO-LINK”, Triax Link or similar device to your SkyHD boxes I/O port, in order to replicate this functionality.
1
Press the Services button on your Sky remote.
The Options menu should now be highlighted.
The Options menu should now be highlighted.

2
Press the 0 button on your Sky remote.
The Picture tab within the Settings menu should now be highlighted.
The Picture tab within the Settings menu should now be highlighted.

3
Now press the 0 1 & Select buttons on your Sky remote in quick succession.
You should now be in the hidden part of the Settings menu with the Setup tab highlighted.
If the following menu is not showing on your TV screen then press the Sky button and repeat the process again from Step 1.
You should now be in the hidden part of the Settings menu with the Setup tab highlighted.
If the following menu is not showing on your TV screen then press the Sky button and repeat the process again from Step 1.

4
Use the Left or Right arrows on your Sky remote to scroll across to the tab labelled “RF Out".
This should change to “RF Outlets” once highlighted.
This should change to “RF Outlets” once highlighted.

5
Press either the Select or Down arrow on your Sky remote to select the "RF Outlets" option.
"RF Channel Number" should now be highlighted.
"RF Channel Number" should now be highlighted.

6
Press the Down button on your Sky remote to highlight the "RF Outlet Power Supply" option.

7
Use the Left or Right arrows on your Sky remote to change the option to ON.

8
Press the Green button on your Sky remote to save the changes.

Sky+ boxes

1
Press the Services button on your Sky remote.
The Services menu should now be shown with the "Using Sky+" option highlighted.
The Services menu should now be shown with the "Using Sky+" option highlighted.

2
Press the 4 button on your Sky remote to select the "System Setup" option.

3
Now press the 0 1 & Select buttons on your Sky remote in quick succession.
You should now be in the hidden Installer Setup menu with the "LNB Setup" option highlighted.
If the following menu is not showing on your TV screen then press the Sky button and repeat the process again from Step 1.
You should now be in the hidden Installer Setup menu with the "LNB Setup" option highlighted.
If the following menu is not showing on your TV screen then press the Sky button and repeat the process again from Step 1.

4
Either scroll down and press Select or use the 4 button on your Sky remote to select the “RF Outlets” option.

5
You should now be in the the "RF Outlets" menu with the "RF Channel Number" option highlighted.

6
Press the Down button on your Sky remote to highlight the "RF Outlet Power Supply" option.

7
Use the Left or Right arrows on your Sky remote to change the option to ON.

8
Press the Down button on your Sky remote to highlight the "Save New Settings" option.
Then press Select on your Sky remote to save the changes.
Then press Select on your Sky remote to save the changes.

Standard Sky Box

1
Press the Services button on your Sky remote.
The Services menu should now be shown with the "Using your Sky Box" option highlighted.
The Services menu should now be shown with the "Using your Sky Box" option highlighted.

2
Press the 4 button on your Sky remote to select the "System Setup" option.

3
Now press the 0 1 & Select buttons on your Sky remote in quick succession.
You should now be in the hidden Installer Setup menu with the "LNB Setup" option highlighted.
If the following menu is not showing on your TV screen then press the Sky button and repeat the process again from Step 1.
You should now be in the hidden Installer Setup menu with the "LNB Setup" option highlighted.
If the following menu is not showing on your TV screen then press the Sky button and repeat the process again from Step 1.

4
Either scroll down and press Select or use the 4 button on your Sky remote to select the “RF Outlets” option.

5
You should now be in the the "RF Outlets" menu with the "RF Channel Number" option highlighted.

6
Press the Down button on your Sky remote to highlight the "RF Outlet Power Supply" option.

7
Use the Left or Right arrows on your Sky remote to change the option to ON.

8
Press the Down button on your Sky remote to highlight the "Save New Settings" option.
Then press Select on your Sky remote to save the changes.
Then press Select on your Sky remote to save the changes.
